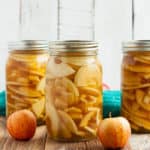
Canning Apple Pie Filling
An easy step-by-step tutorial for beginners on canning apple pie filling. This simple guide teaches you how to preserve a low-sugar apple pie filling recipe without Clear Jel in a water bath canner.
Servings: 7 quarts
Ingredients
- 21 pounds apples
- 12 cups water
- 2 cups sugar
- 1/4 cup bottled lemon juice
Instructions
Canning Prep
- Prepare your water bath canner by filling it with water. You just need to have enough water to cover the jars by 1 inch once the water is boiling.
- Set the canner on the stove. Turn the burner to high. Once it reaches a boil, reduce it to simmer. You want to keep the water hot so that everything is ready when the apple slices are.
- Wash and sanitize your jars. You’ll want to keep them warm to avoid having them crack when placed in the canner. You can fill them with hot water, or place them on a tray in the oven at 170˚F.
- Wash your lids with hot soapy water and place them in a clean bowl for now.
Apple Prep
- Fill a bowl with cold water and 1/4 cup of lemon juice (or 2 tsp of citric acid). Set up your workstation with a peeler, cutting board, sharp knife, and a bowl for the peels and cores.1/4 cup bottled lemon juice
- Clean your apples, and peel, core, and slice the apples thinly. Place into the lemon water.21 pounds apples
- Once you have a bunch of slices soaking, combine water and (optional) sugar in a large saucepan and bring to a low boil.12 cups water, 2 cups sugar
- Cook the apple slices in batches in the hot syrup, and boil for 2 minutes, stirring constantly.
- Fit a funnel on the hot and sterile canning jars and transfer the cooked apples into the jars. Pro tip: I found that tongs worked the best for this.
- Slowly ladle in hot water or syrup until you cover the apples in the jar, allowing for 1 inch of headspace.
- Use a wet clean rag and wipe the rim of the jars to make sure it is free of any food.
- Place a clean lid on the jar and tighten the ring to fingertip tight.
Canning the Apple Pie Filling
- Using canning tongs, gently place your jars in the canner. Put the lid on, and set your timer. Pro tip: the water must return to a boil in the canner before you can start the timer.
- Once your jars are completely covered with the boiling water, put the lid on and process for:*0-1,000 ft – Pints & Quarts =25 min*1,001-3,000 ft – Pints & Quarts =30 min*3,001-6,000 ft – Pints & Quarts =35 min*6,000 ft+ – Pints & Quarts =40 min
- Once the apple slices have processed for the appropriate amount of time, remove the canner from the burner, and carefully remove the lid of the canner (Pro tip: use oven mitts to take the lid off because the steam is super hot).
- Let the jars sit in the canner with the canner's lid off for 5 minutes.
- Remove the jars using canning tongs and place them on towels on the counter undisturbed for 12-24 hours.
- After everything has cooled, check the seal by pushing down on the middle of the lid. If it doesn't give way, it's sealed. If the lid bows a little bit, reprocess it or put that jar in the fridge and use it within 3 weeks.
- Label the sealed jars, and store in a cool dark place for up to a year.
Notes
- Headspace is defined as the space between the top of the food and the top of the jar.
- You’ll need about 21 pounds of apples for canning 7 quarts of apple pie filling.
- Once the jars have sealed, remove the rings. Label and store sealed jars in a cool (best results are 50-70˚F) dark place for up to 12-18 months.
- This canned pie filling can be frozen in wide-mouth canning jars. Leave 1.5 inches of headspace in the jars to allow for expansion during freezer. Allow to fully cool in the jar before freezing.
Nutrition
Serving: 0.5cup | Calories: 141kcal | Carbohydrates: 37g | Protein: 0g | Fat: 0g | Saturated Fat: 0g | Cholesterol: 0mg | Sodium: 5mg | Potassium: 222mg | Fiber: 4g | Sugar: 22g | Vitamin A: 110IU | Vitamin C: 10.1mg | Calcium: 14mg | Iron: 0.3mg