Dehydrated Apples Recipe {Dehydrator or Oven}
Learn all about dehydrating apples in a food dehydrator or in an oven. This dried apples recipe is a simple project for adults and kids and makes amazing snacks.
Servings: 20
Instructions
- Fill a bowl with cold water and 1/4 cup of lemon juice.1/4 cup bottled lemon juice
- Set up a workstation with a peeler, cutting board, sharp knife, and a bowl for the peels and cores.
- Clean apples, peel, core, and slice the apples thinly.10 apples
- Place the apple slices in the water/juice mixture.
Dehydrator Instructions
- Arrange the slices on dehydrator trays so that there is space around each slice, and the slices are not touching.
- Set dehydrator to the "fruit/vegetables" setting (135˚F) and dry for 4-8 hours. Rotate trays every few hours.
- The length of time the apple slices need to dry will vary based on how many trays you have going on at once, and how thick the slices are.
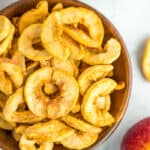
- Apples are done when they don’t feel wet anymore. Some apples will finish before the others on the same tray. Remove those that are done and set aside.
Oven Baking Instructions
- Place soaked apple slices on baking drying racks set into baking sheets.
- Place in the oven at the lowest temperature possible (usually 140-170˚F) and prop open the door with the handle of a wooden spoon. This allows condensation to escape instead of just settling back onto the apples.
- Bake for 5-8 hours.
Notes
- Avoid the temptation to increase the heat on the dehydrator or oven to speed up the process. Low and slow wins in the race on this one.
- You do not have to peel the apples, but the peels may get very hard during the drying process and could detract from the taste.
- Allow the dried apples to FULLY COOL before storing them in an air-tight container. They will keep for at least a year if not exposed to too much light or heat.
Nutrition
Serving: 40g | Calories: 95kcal | Carbohydrates: 25g | Protein: 0g | Fat: 0g | Saturated Fat: 0g | Cholesterol: 0mg | Sodium: 1mg | Potassium: 199mg | Fiber: 4g | Sugar: 19g | Vitamin A: 100IU | Vitamin C: 10.1mg | Calcium: 11mg | Iron: 0.2mg