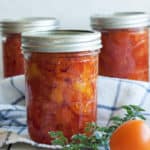
Canning Stewed Tomatoes
Follow this step-by-step tutorial to learn how simple canning stewed tomatoes can be. A key ingredient for so many comfort foods, canned stewed tomatoes is an easy recipe that can be pressure-canned or processed via water bath canning.
Servings: 7 quarts
Equipment
Ingredients
- 22 lbs tomatoes
- 14 tbsp lemon juice {2 tbsp per quart}
Instructions
Pressure Cooker Instructions
- Rinse tomatoes and cut in half and then quarters.22 lbs tomatoes
- Prepare a large bowl with ice water.
- Wash and clean your jars. It is no longer necessary to sterilize jars before canning (hurray!) but you should make sure they are preheated enough to not crack when placed in hot water.
- Wash your lids with hot soapy water and place them in a clean bowl.
- Add the tomatoes to a pot of boiling water and parboil them until you see the skins start to come off the tomatoes (about 1-2 minutes).
- Use a slotted spoon and remove the tomatoes and place them in the ice water.
- Working with the tomatoes one at a time, remove any skin that hasn't already slipped off.
- Drain the pot you parboiled the tomatoes in, and add one-third of the skinned tomatoes to it. Cook over medium heat to maintain a gentle boil, stirring often.
- Using a potato masher, gently crush the tomatoes to release juices. Add another one-third of the tomatoes, and gently crush those as well.
- Add the final third of tomatoes, and maintain the pot at a low boil for 5 minutes. Stir often to prevent scorching.
- Add 3 quarts of water to your pressure canner and put it on a burner set to high. Make sure there is a canning rack in the bottom of the canner.
- Add lemon juice or citric acid to your canning jars.Quarts: 2 tbsp lemon juice OR 1/2 tsp citric acid. Salt (optional) 1 tspPints: 1 tbsp lemon juice OR 1/4 tsp citric acid. Salt (optional) 1/2 tsp14 tbsp lemon juice
- Using a canning funnel, ladle hot tomatoes into the jars. Pack the tomatoes using a spoon to smoosh them down until they are covered in their own juices. Leave 1/2 inch headspace.
- Using a long utensil (I prefer a plastic chopstick), remove all the air bubbles from the jar.
- Clean the rim of the jar very well with a hot damp rag.
- Place a clean lid on the jar. Add a ring, and tighten to fingertip tight.
- Using canning tongs, gently place the jars in the canner.
- Lock the lid. Soon, steam will start coming through the vent pipe. Allow the steam to pass through for about 10 minutes. Then put the pressure regulator on top.
- Pretty soon, the air vent will pop up.
- *0-2,000f ft {PSI: 6 lbs of pressure} = Pints & Quarts 20 min*0-2,000f ft {PSI: 11 lbs of pressure} = Pints & Quarts 15 min*2,001-4,000k ft {PSI: 7 lbs of pressure} = Pints & Quarts 20 min*2,001-4,000k ft {PSI: 12 lbs of pressure} = Pints & Quarts 15 min*4,001-6,000k ft {PSI: 8 lbs of pressure} = Pints & Quarts 20 min*4,001-6,000k ft {PSI: 13 lbs of pressure} = Pints & Quarts 15 min*6,001-8,000k {PSI: 9 lbs of pressure} = Pints & Quarts 20 min*6,001-8,000k {PSI: 14 lbs of pressure} = Pints & Quarts 15 min
- When the dial gauge reaches the appropriate PSI, reduce the burner temp to medium, and start your timer. The pressure must stay at the PSI or (a little bit) above for the duration of the cooking time. You’ll likely need to adjust the temp on the burner a few times depending on your stove.
- When the time is up, remove the canner from the burner and allow it to sit until you hear a distinctive “click” of the air vent dropping. Remove the pressure regulator and carefully remove the lid of the canner (Pro tip: I always use oven mitts when I take the lid off because the steam is super hot).
- Let the jars sit for 5 minutes in the canner and then lift them out with canning tongs. Pro tip: allowing the jars to sit in the canner with the lid off can help reduce the siphoning of liquid in your jars.
- Remove with canning tongs and place on a towel where they can sit undisturbed for 12 hours.
- After a few hours, to check for sealing, gently press down in the middle of the lid. If the lid has no give, it’s sealed. If you can press the lid in and it pops a bit, your jars are not sealed.
Water Bath Canning Instructions
- Follow steps 1-10 above in the Pressure Canning Instructions.
- Prepare your water bath canner by filling it with water. You just need to have enough water to cover the jars by 1 inch once the water is boiling.
- Set the canner on the stove. Turn the burner to high. Once it reaches a boil, reduce it to simmer. You want to keep the water hot so that everything is ready when the tomatoes are
- Follow steps 12-16 above in the Pressure Canning Instructions
- Return the water in the canner to a rolling boil.
- Using canning tongs, carefully lower the jars into the boiling water and place the lid on and set your timer.
- Process pints and quarts based on the elevation guide below: Pro tip: the water must return to a boil in the canner before you can start the timer.*0-1,000 ft = Pints - 35 min Quarts - 40 min*1,001-3,000 ft = Pints - 40 min Quarts - 50 min*3,001-6,000 ft = Pints - 45 min Quarts - 55 min*6,000 ft+ = Pints - 50 min Quarts - 60 min
- Once the stewed tomatoes have processed for the appropriate amount of time, remove the canner from the burner, carefully take the lid off the canner, and allow it to sit for 5 minutes. Pro tip: I tend to just slide it into the middle of my stove, as it weighs a ton.
- Carefully remove the jars using canning tongs, and place them on a thick towel in a place where they can be undisturbed for 12 hours. The lids should start to pop within 20-30 minutes of being removed from the water.
Notes
- 22 lbs tomatoes per 7 quarts, or 14 lbs tomatoes per 9 pints. About 3 lbs tomatoes per quart.
- Once the jars have sealed, remove the rings. Label and store sealed jars in a cool (best results are 50-70˚F) dark place for up to 12-18 months.
Nutrition
Serving: 1g | Calories: 263kcal | Carbohydrates: 58g | Protein: 13g | Fat: 3g | Saturated Fat: 1g | Sodium: 72mg | Potassium: 3410mg | Fiber: 17g | Sugar: 38g | Vitamin A: 11875IU | Vitamin C: 207mg | Calcium: 144mg | Iron: 4mg