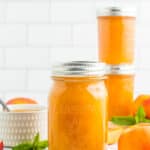
Old-Fashioned Peach Preserves (No Pectin)
Homemade peach preserves is a delicious spread for toast, yogurt, or dessert recipes. Made without pectin and lower in sugar than traditional recipes, this recipe can be frozen or canned in a water bath canner.
Servings: 5 half-pints
Equipment
- Tongs
Ingredients
- ice
- 6 lbs ripe peaches {to yield ~8 cups of sliced peaches}
- 1/4 cup bottled lemon juice
- 2 cups sugar
Instructions
Making Peach Preserves
- Fill a large mixing bowl with ice water. Set aside.ice
- Use a paring knife and cut the peach around the middle to separate. Remove the pit. Put the halves in a large bowl of water treated with lemon juice (~1/4 cup) or citric acid (1 tbsp).6 lbs ripe peaches, 1/4 cup bottled lemon juice
- Add one layer of peaches at a time to a pot of boiling water for about 60 seconds.
- Remove using a slotted spoon and place in the ice water for 1 minute.
- Use the slotted spoon to remove the peach halves from the ice bath. Grab one of the peaches and gently peel the skin back.
- Slice the peeled peaches or roughly chop them.
- Place the peaches in a heavy-bottomed pot and cook, stirring often, over medium heat until they have softened. This could take 10-25 minutes, depending on the ripeness of your peaches. Add splashes of water if the preserves are starting to burn.
- Once the peaches have softened, gently mash them using a potato masher, wooden spoon, or pastry cutter.
- Once the peaches are mashed to your preference, add the sugar, and increase the stove temperature to medium-high.2 cups sugar
- Bring the peaches to a low boil, stirring constantly for two minutes. Pro tip: adjust the temperature as needed to keep the preserves from popping or boiling over.
- Reduce the heat to a simmer, and cook the preserves down, stirring often, for 10-15 minutes or until the mixture has thickened and the volume has been reduced by about 20-30%. Skim any foam off the surface.
Canning Peach Preserves
- While the preserves are cooking, start your canning prep.
- Prepare your water bath canner by filling it with water. You need to have enough water to cover the jars by 1 inch once the water is boiling.
- Set the canner on the stove with the lid on. Turn the burner to high. If it reaches a boil before you’re done making the preserves, reduce it to a simmer, keeping the lid on.
- Wash and clean your jars. You’ll want to keep them warm to avoid having them crack when placed in the canner. You can fill them with hot water, or place them on a tray in the oven at 170˚F.
- Wash your lids and set them aside in a clean place.
- Using a canning funnel, ladle the hot preserves into the jars, leaving 1/2 inch headspace. Headspace is the distance between the top of the food and the top of the jar.
- Clean the rim of the jar very well with a hot damp rag.
- Place a clean lid on the jar. Add a ring, and tighten to fingertip tight.
- Using canning tongs, add jars to the boiling water, and put the canner lid on. Pro tip: you must have at least 1 inch of water over the tops of the jars for safe canning.
- Process pints and half-pints based on the elevation guide below:*0-1,000 ft = 5 minutes*1,001-6,000 ft = 10 minutes*6,000 ft+ = 15 minutes
- Once the peaches have processed for the appropriate amount of time, remove the canner from the burner, carefully remove the lid, and allow it to sit for 5 minutes. Pro tip: due to steam, I wear oven mitts while removing the lid.
- Using canning tongs, carefully remove the jars, and place them on a thick towel in a place where they can be undisturbed for 12 hours.
- After the jars have rested for about 12 hours, gently press down in the middle of each lid. If it "gives" at all, the jar didn't seal. Either enjoy it that day, put it in the fridge, or reprocess it.
Notes
- You can use frozen peaches - see more details in the post on how to thaw them and how the overall cooking time is impacted.
- As it cooks down, the preserves will darken in color. This is normal and ok!
- Once the jars have sealed, remove the rings. Label and store sealed jars in a cool (best results are 50-70˚F) dark place for up to 12 months.
- Once you open a jar, refrigerate the jar for 1-3 weeks.
- Makes 5 half-pints.
Nutrition
Serving: 2tbsp | Calories: 34kcal | Carbohydrates: 8g | Protein: 0.3g | Fat: 0.1g | Saturated Fat: 0.01g | Polyunsaturated Fat: 0.03g | Monounsaturated Fat: 0.02g | Sodium: 4mg | Potassium: 42mg | Fiber: 1g | Sugar: 8g | Vitamin A: 111IU | Vitamin C: 2mg | Calcium: 1mg | Iron: 0.1mg