As an Amazon Associate, I earn from qualifying purchases.
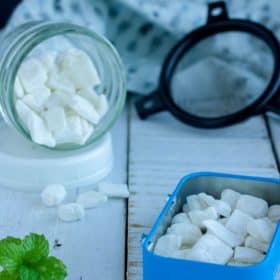
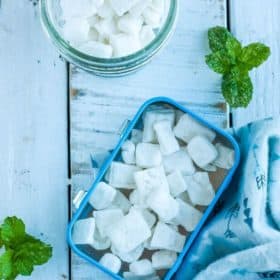


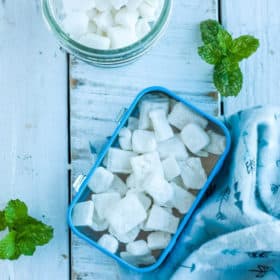
An easy recipe for Homemade Mints that tastes just like Altoids! Perfect for Christmas gifts, or wedding or baby shower favors.

It all started in high school…my obsession with breath mints and chapstick (related: How to Make Chapstick). I’m not sure what the root cause, was, but I was hooked. At the time it was Carmex and Starbucks mints.
Starbucks and I had a good relationship for a long time, but then they phased out my beloved mints and replaced them with a tin of mints that cost the same but had 1/10th as many mints. Well played Starbucks, well played.
So, you know what is about to happen, right? I mean I titled this post “Homemade Mints”. Anyone could see it coming.
We’re making Homemade Mints! You nailed it. Genius.
What Ingredients Are In Homemade Breath Mints?

This homemade mint recipe is rocking:
- Gum paste mix (available online or any place with cake decorating products. If you get it at Joann’s, make sure you use a coupon!)
- Powdered sugar (to keep things from sticking. Learn how to make powdered sugar) or xylitol.
- Flavoring of your choice. You can use pure baking flavoring or extract (related: Homemade Peppermint Extract).
How Do You Make Breath Mints?
*Detailed and printable recipe available at the bottom of the post.
In a deep bowl, mix the gum paste with the flavoring, and water until it forms a very thick paste. Pro tip: start with a whisk but end with a spoon or else it gets too thick. TWSS.

Put parchment paper on a baking sheet, and dust with powdered sugar.
Put the “dough” on the parchment, and dust with a bit more powdered sugar. Press it as thin as you can with the heel of your hand.
Now at this point, you could make little balls, use a tiny mold to make these cute shapes, or even use a fat straw to punch out circles. That is a lot of work, so I recommend dusting a pizza cutter with powdered sugar and cut them into strips and pieces.
It may not win you the “most uptight and anal retentive” trophy at your neighborhood Pinterest awards, but it gets the job done.

Fill a lidded container with the pieces, and sprinkled a bit more powdered sugar in there. Shake it a few times to make sure that all the pieces are coated enough to not stick to each other.
Spread the pieces back on the baking sheet with the parchment, and let dry at room temperature for at least 3 days. Your house will smell awesome, but please watch out for kiddos and pets. If you are using Xylitol it is especially dangerous for pets.
Place finish mints in a mesh strainer and shake to remove the excess powdered sugar. Transfer to lidded containers and/or cute jars for giving as gifts.

Pro Tips/Recipe Notes
- Need to speed up the drying process? Bake the homemade mints at the lowest heat your oven will allow (typically about 170 degrees F) for 2 hours. Allow mints to cool and test to see if they are hard enough to your liking. <—TWSS
- Homemade mints will keep in an air-tight container for up to six months.
- If you want to make round mints, dip a fat straw into powdered sugar and press it into the dough. You could also roll it into a “snake” and slice it into small pieces.
- There are some people who use essential oils for cooking. I’m 100% uncomfortable recommending that at all, so stick to flavoring that is intended for cooking.

Variations/Flavor Combos
- You’re already thinking Vanilla Mint, so let’s do this! Combine peppermint with a splash of vanilla extract (related: Homemade Vanilla Extract).
- Cinnamon would be amazing in homemade mints; spicy and lovely.
- Combining chocolate with mint would be so good it might make a puppy smack itself.
OTHER RECIPES LIKE THIS:
Homemade Mints {Altoids Mints Copycat}
Ingredients
- 1 tsp peppermint flavoring
- 2 cups dry gum paste
- 2 tbsp water
- 1/4 cup powdered sugar
Instructions
- In a deep bowl, mix the gum paste with the flavoring, and water until it forms a very thick paste.
- Put parchment paper on a baking sheet, and dust with powdered sugar.
- Put the “dough” on the parchment, and dust with a bit more powdered sugar. Press it as thin as you can with the heel of your hand.
- Now at this point, you could make little balls, use a tiny mold to make these cute shapes, or even use a fat straw to punch out circles. That is a lot of work, so I recommend dusting a pizza cutter with powdered sugar and cut them into strips and pieces.
- Fill a lidded container with the pieces, and sprinkled a bit more powdered sugar in there. Shake it a few times to make sure that all the pieces are coated enough to not stick to each other.
- Spread the pieces back on the baking sheet with the parchment, and let dry at room temperature for at least 3 days. Your house will smell awesome, but please watch out for kiddos and pets. If you are using Xylitol it is especially dangerous for pets.
- Place finish mints in a mesh strainer and shake to remove the excess powdered sugar. Transfer to lidded containers and/or cute jars for giving as gifts.
Nutrition
Nutrition information is automatically calculated, so should only be used as an approximation.


Absolutely terrible and a huge gummy mess!!! Took forever to clean the gum paste glue out of my kitchen. 2 tbsp water didn’t join the powder at ALL. More water created a gooey mess that overtook my whole kitchen. Ratios are ALL wrong, steps are way over simplified, and this DOES NOT work. The gum powder listed in the recipe is discontinued. I tried my best to find an identical substitute, but I guess not all cellulose gum powders are created equal. Recipe should be tested and updated with a new product, or REMOVED from this website!
Carol, the gum paste is still available at multiple retailers. I’m not sure why you were unable to find it, and I’m sorry that the brand you used was not a success, but expecting me to test every brand available is unreasonable. I showed the brand I used and you used something else. Results cannot be guaranteed when you change aspects of the recipe.
I showed how to make the mints using the ingredients that I bought and used and you can see based on the photos that they were a success.
I can only find ready made gum paste locally, not the dry. Can I just knead the flavoring into the gum paste? Then continue on with the rolling and drying?
Hi Nancy, I have not worked with gum paste that isn’t dry, so I don’t feel comfortable saying if it will work or not.
Is it possible to replace the sugar with an artificial sweetener like xylitol? I want a mint like altoids that isn’t as bad for my teeth
Hi Ian, I have not tried it so I do not feel comfortable saying if it will work or not.
So here are my recommendations: Use almost 2 cups of powdered sugar, 1 packet of gelatin, and a pinch of cornstarch and mix that together and use that as your gum paste. then add 1 tablespoon of water. i tried 2 and it was way too thin. one is perfect. and 6 1/2 tsp of peppermint extract. if you’re using oil it might be less but this will make a nice strong mint. then just follow the rest of the directions. I baked then at 170 in 1-2 hour intervals and then let it cool. they’ll be soft in the oven but harden once cooled. So just do 2 hours cool and then repeat. store in an airtight container in the fridge. they’ll keep for awhile but i ate them in one day. I put red food coloring in half and then put the red half on top of the white half, rolled it out and punched the mints with the back of an icing tip. they came out like a thick altoid in size and very minty. I used them for my secret santa christmas party. Enjoy!!!
Can I replace the powdered sugar with cornstarch for the same effect without the sweetness? Also has anyone tried making these in a dehydrator to speed up drying?
Yes, cornstarch would work but could be pretty nasty when you actually go to eat them. I would highly recommend brushing all the excess off once they’ve dried.
I haven’t used a dehydrator and no one has reported using one. If you do, please let me know how it goes and I can add the details to the recipe notes.
I followed this recipe to the “T” and they came out like soft, butter/dinner mints. I made a batch and then doubled the McCormick peppermint oil and they were still very faint mint tasting and not an Altoids type at all. This recipe is good if you like mints on the sweet side. But def not an altoid copycat.
Can you add food colouring?
Sure thing! If you have food “gels” those add color without impacting the flavor. If you want an intense color, I find that liquid food coloring often needs A LOT to achieve that.
Also consider that the coloring will impact what your mouth, tongue, and potentially teeth will look like after consuming the mint.
I was wondering how much of vanilla and peppermint to use? I want to try that mixture. Suggestions?!
I would start with 1/4 tsp of each, taste, and adjust based on your preference.