As an Amazon Associate, I earn from qualifying purchases.
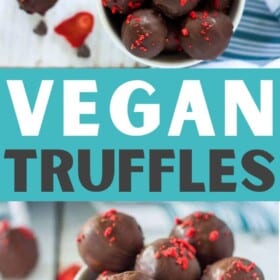
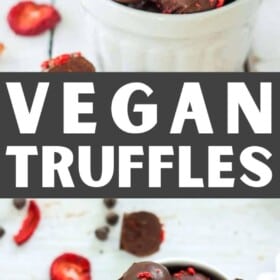


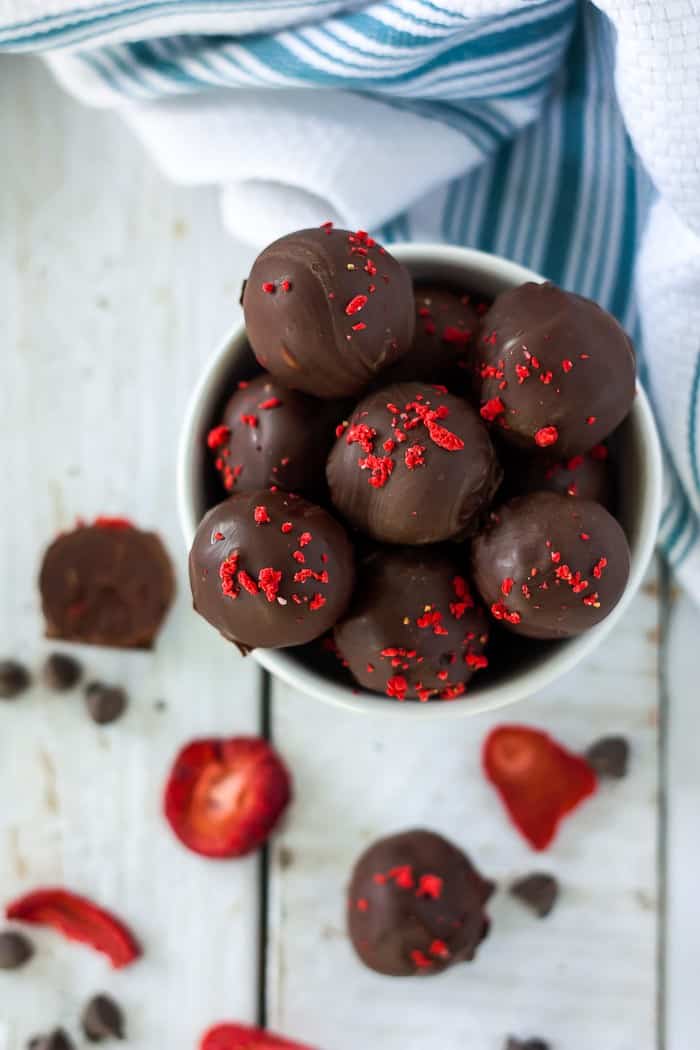
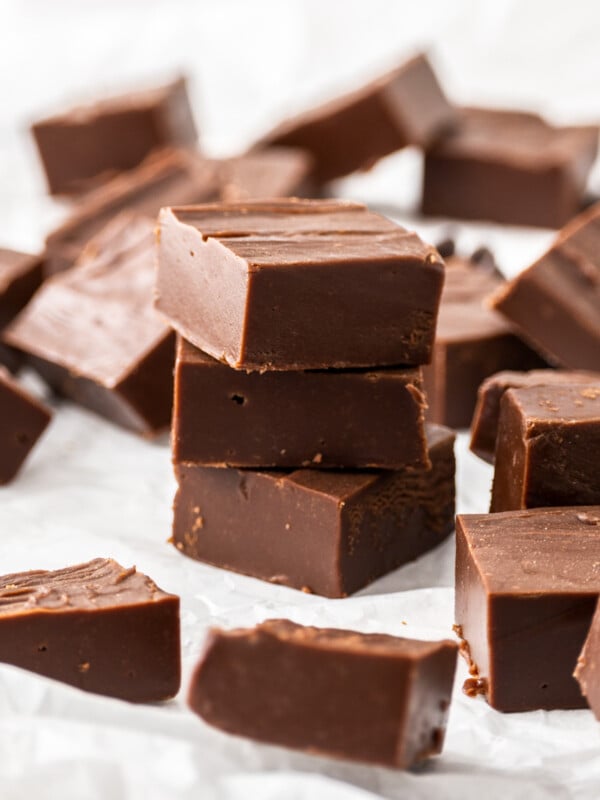
An easy and decadent melt-in-your-mouth recipe for incredible homemade Vegan Chocolate Truffles. These rich delicious dark chocolates are both vegan and dairy-free.

These vegan truffles look complicated and like you need some sort of college degree in handling chocolate to make. But, I’m here to tell you that you, yes you can make them!
ingredients
- Dark chocolate. Something 60-80% dark works best.
- Canned coconut milk. Full fat. Don’t skimp on this!
- Coconut butter
- Coconut oil
- Freeze-dried strawberries
Just a quick note about the coconut milk and butter. I’m sensitive to coconut taste in things that I don’t want to be “coconutty”, but there is no overt coconut taste in these truffles. Yay!
How to Make Vegan Chocolate Truffles
*I’ll walk you through it here with some photos and tips, and you’ll also find a printable recipe card at the bottom of the post with exact measurements, etc. You can also click “jump to recipe” to skip down.
Quick note: this recipe is very easy to make but does require you to use some patience for cooling and tempering. Please follow the prompts and directions to ensure the best results. It looks like a lot of steps, but most of it is just waiting.
In a small saucepan combine coconut milk and coconut butter. We’re using the cream from the top of the can of coconut milk and then some of the liquid. Heat on medium until the coconut butter is melted and small bubbles start to appear under the surface.
Pulse freeze-dried strawberries in a food processor until there are mostly small chunks and fine strawberry powder. No food processor? Finely chop with a knife until most pieces are uniform in size.

Make the Vegan Ganache (filling):
Put the chocolate in a heatproof bowl. Pro tip: if you’re not using chocolate chips, chop the chocolate into uniform sizes to ensure even melting.
Pour warmed coconut milk/butter mixture over the chocolate. Let it sit for two minutes and then gently stir with a silicone spatula until smooth. Pro tip: if lumps remain, keep gently stirring until the heat from the chocolate melts them.

Add in most of the crushed strawberries, reserving about 2 tbsp in the food processor.

Allow the ganache to cool for an hour on the counter and then transfer it to the fridge until it is mostly firm. It is ready when it has the consistency of cookie dough. It should be workable but not messy on your hands.
Shaping The truffles:
Using a spoon, cookie scoop, or melon baller, place truffles on a parchment or waxed paper-lined rimmed baking sheet. Pro tip: scoop all your truffles at once and then go back and gently roll them into uniform shapes. This will keep your hands clean until the end.
Place the truffles in the freezer for 1 hour.

Make The Chocolate Coating:
In a microwave-safe bowl, heat chopped chocolate for 30 seconds in the microwave. Wait 30 seconds, and then heat for another 30 seconds. Wait another 30 seconds and then microwave for an additional 30 seconds. <—don’t skip this heat/wait/heat/wait process as it melts the chocolate without overheating it! Overheated chocolate will look dull and streaky when it cools.
Add in the coconut oil and stir until it has melted. Allow the chocolate to cool to 84-88˚F degrees. I used a kitchen thermometer to test this, but if you don’t have one, this website also notes that the chocolate is likely ready when it is starting to set around the edges of the bowl.
Dipping the Vegan truffles:
Check the consistency of the reserved strawberry powder to see if it is still workable. Mine clumped up a bit so I pulsed it again in the food processor until it was workable.
Remove the truffles from the freezer and place one into the melted chocolate. Spoon chocolate over it until covered. Use the spoon to place the truffle on the tines of a fork. Gently use your free hand to tap the hand holding the fork to remove excess chocolate. Don’t tap the fork directly or your truffle may fall.
Remove the truffle from the fork by scooting it back onto the parchment-lined baking sheet. You can make this easier by nudging it off with a toothpick or skewer.
Immediately sprinkle it with a pinch of the strawberry powder. If you wait too long the strawberries will not stick to the chocolate coating.

Repeat until all the truffles have been dipped. Pro tip: if your dipping chocolate starts to firm up, microwave for 5 seconds at a time until it has returned to a pourable consistency.
Allow the truffles to cool on the baking sheet on the counter (not the fridge!) until the chocolate coating has hardened and they are no longer warm to the touch. Transfer to an air-tight container and store in a cool part of the house.
Reality check: ^ that all seems like a lot of work, right? Wrong! It is super easy but takes a few truffles to get the hang of it.
How to Store Homemade truffles
Storing leftovers: Store truffles between 60-65˚F. Do not store them in the fridge.
Freezing leftovers: Place truffles on a baking sheet lined with parchment or waxed paper. Allow them to freeze for 2-3 hours and then transfer to freezer-safe storage.
Allow them to come to room temperature before serving.
Pro Tips/Recipe Notes
- Can’t find coconut butter? I had to order coconut butter online, but you can also make your own by blending unsweetened coconut flakes in a food processor for 10-15 minutes.
- Use only silicone spatulas or utensils to stir the chocolate. It makes it easier to work with and won’t house any previous cooking odors as wooden spoons can.
- Do not cover the ganache mixture with plastic wrap or anything else while it is cooling in the fridge. That could create condensation which would introduce water to your chocolate. Water and chocolate are total frenemies and should not be combined.
- If your ganache is too hard when you take it out of the fridge, that’s ok; your mixture is not ruined! Let it sit at room temperature until it is workable. Alternatively, you could microwave it for 10 seconds, stir and microwave in 5-second increments until it is workable. Workable means pliable but not transferring too much chocolate to your hands.
- You’re welcome to roll your truffles in cocoa powder, chopped nuts, or shredded coconut instead of melted chocolate. Improvising is fun!
Vegan Chocolate Truffles

Ingredients
Ganache/Truffle
- 1 cup coconut milk, full-fat {the cream from the top of the can + some of the liquid milk}
- 1/4 cup coconut butter
- 1 oz freeze-dried strawberries {finely chopped to yield about 1/3 cup}
- 2 cups dark chocolate {chopped}
Chocolate Coating
- 1.5 cups dark chocolate {chopped}
- 1 tbsp coconut oil
Instructions
- In a small saucepan combine coconut milk and coconut butter. Heat on medium until coconut butter is melted and small bubbles start to appear under the surface.1 cup coconut milk, full-fat, 1/4 cup coconut butter
- Pulse freeze-dried strawberries in a food processor until there are mostly small chunks and fine strawberry powder.1 oz freeze-dried strawberries
Make the Ganache (Filling)
- Put chocolate in a heatproof bowl. Pro tip: chop in uniform sizes to ensure even melting.2 cups dark chocolate
- Pour warmed coconut milk/butter mixture over the chocolate. Let it sit for two minutes and then gently stir with a silicone spatula until smooth. Pro tip: if lumps remain, keep gently stirring until the heat from the chocolate melts them.
- Into the chocolate, stir in most of the chopped strawberries, reserving about 2 tbsp in the food processor.
- Allow the ganache to cool in the bowl for an hour on the counter and then transfer it to the fridge until mostly firm. It is ready when it has the consistency of cookie dough. It should be workable but not messy on your hands.
Shaping the Truffles
- Using a spoon, cookie scoop, or melon baller, place truffles on a parchment or waxed paper-lined rimmed baking sheet. Pro tip: make all your truffle scoops at once and then go back and gently roll them into uniform shapes.
- Place the truffles in the freezer for 1 hour.
Make Chocolate Coating
- In a microwave-safe bowl, heat remaining chopped chocolate for 30 seconds in the microwave. Wait 30 seconds, and then cook for another 30 seconds. Wait another 30 seconds and then microwave for an additional 30 seconds.1.5 cups dark chocolate
- Add in the coconut oil and stir until it has melted. Allow chocolate to cool to 84-88˚F degrees. I used a kitchen thermometer to test this, but if you don't have one, the chocolate is likely ready when it is starting to set around the edges of the bowl.1 tbsp coconut oil
Dipping the Truffles
- Remove truffles from the freezer and place one ball in the melted chocolate. Spoon chocolate over it until covered.
- Use the spoon to place the truffle on the tines of a fork. Gently use your free hand to tap the hand holding the fork to remove excess chocolate. Don't tap the fork directly or your truffle may fall.
- Using a toothpick or skewer, gently remove the truffle from the fork by scooting it back onto the waxed paper-lined baking sheet.
- Immediately sprinkle it with a pinch of the strawberry powder.
- Repeat until all the truffles have been dipped. Pro tip: if your dipping chocolate starts to get hard to work with, microwave for 5 seconds at a time until it has returned to a pourable consistency.
- Allow the truffles to cool on the baking sheet on the counter (not the fridge!) until the chocolate coating has hardened and they are no longer warm to the touch.
- Transfer cooled truffles to an air-tight container and store them in a location that is between 60-65˚F.
Notes
- Don’t skip the heat/wait/heat/wait process as it melts the chocolate without overheating it! Overheated chocolate will look dull and streaky when it cools.
- Do not cover the ganache mixture with plastic wrap or anything else while it is cooling in the fridge as it could create condensation.
- If your ganache is too hard when you take it out of the fridge, let it sit at room temperature until it is workable. Alternatively, you could microwave it for 10 seconds, stir and microwave in 5-second increments until it is workable.
Nutrition
Nutrition information is automatically calculated, so should only be used as an approximation.


These look delicious! I can’t wait to make them! Since im sticking to a low carb diet, I’m going to try making these with lilys chocolate or home made sugar free chocolate. I’ll report back how it turns out!
There used to be a chocolate university. My family and I used to go to bend,
Oregon when I was kid. There was an amazing chocolate shop there and the owner/ chocolatier had been to it. Needless, to say that was my post- high school plan for several years. Lol I did end up taking an online course and am now a certified chocolatier. It was a really good course and i learned a lot. I even sold my chocolates for awhile.
I have heard good things about Lily’s chocolates but haven’t worked with it myself (yet).
OMG a certified chocolatier? That is sooooo cool!
I can’t believe you didn’t add a snicker after “delicious, delicious boobs”. Yes, this could definitely be made keto using Lily’s chocolate bars or even a 90% chocolate bar.
Eh, that one was too easy!
Have you tried melting Lily’s chocolate? I wonder if the lack of any cocoa mass would impede the truffle at all.
Oh, you’re killing me here. I have issues with dairy but recently was told by my doctor to avoid chocolate as it’s a potential migraine trigger (and it seems yes, I get headaches when I eat chocolate, so UGH). These look delicious. Here’s a tip if you’re not a coconut taste fan–Trader Joe’s has a coconut oil that has hardly any coconut “flavor” at all as it’s triple filtered or something? I use it for popping corn and it works great, and doesn’t make my kitchen smell yucky.
Ugh, I’m sorry Karen! Everyone in my life with migraines has been told to cut out chocolate and caffeine. I really hope it works for you!
I’ll check out the TJ’s coconut oil. Thank you!