As an Amazon Associate, I earn from qualifying purchases.

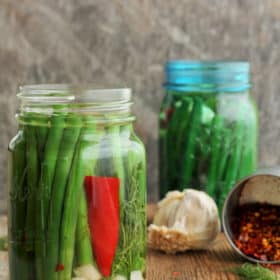
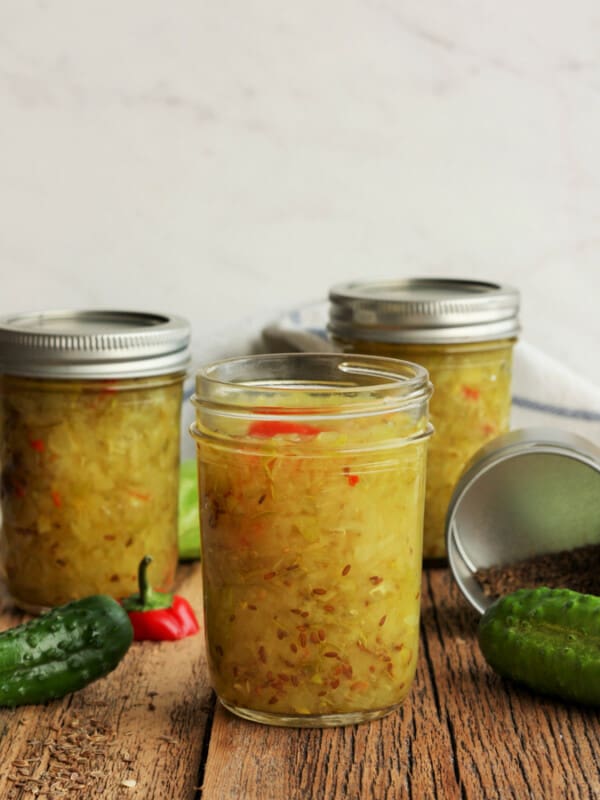
Learn the secrets of how to make amazing Refrigerator Dilly Beans. This easy recipe for refrigerator pickled beans involves zero canning and will help you “put up” the summer bounty in a delicious and snackable way.

Two jars of dilly beans with garlic and red peppers on a wooden board
Want to save this recipe?
Just enter your email and get it sent to your inbox! Plus you’ll get new recipes from us every week!
Please enable JavaScript in your browser to complete this form.

Dilly beans are one of those foods that I have a hard time controlling myself around once I get started. They’re so crunchy, delicious, and addicting that you’ll just want to keep eating them.

At least they’re a vegetable, right? Surely vegetable binging can’t be bad.

What Are Dilly Beans?

Dilly beans are just pickled green beans. They’re super crisp and delicious and pretty much everything you want in life.

Love a good pickled veggie recipe? Try my Pickled Shallots, Cucumber and Onion Salad, Quick Pickled Cauliflower, and these Refrigerator Pickled Beets.

What Kind of Beans Should I Use in a Dilly Bean?

Use bush or pole beans that are fairly uniform in size. I like to pick beans no fatter than a pencil. The beans inside haven’t yet developed and become tough, and you’re going to get an amazing crunchy pickled product as a result.

You can use any color of bean – green, purple, or white wax beans. If you happen to grown beans yourself, I love planting purple “green” beans because they’re so easy to find in the vines! They turn green when cooked, but there are no sneaky ninja beans hiding and making harvesting a challenge. Use leftovers to make Crispy Air Fryer Green Beans.

Do not use beans labeled “petite haricot verts”, which is French for “makes crappy dilly beans”. I think. I don’t know, I took ASL in school.

Have leftover beans and are running out of fridge space? Check out this post on how to can green beans for a shelf-stable option.

How Do You Use Dilly Beans?

Fresh eating (obvs), on burgers, in a salad, a crudites platter, or a cheese and meat tray are all wonderful ways to use up this awesome refrigerator pickled green bean bounty.

So Can I Can These Refrigerator Dilly Beans?

This recipe is for refrigerator dilly beans. These beans are NOT shelf stable and must be stored in the fridge. They should not be canned as the recipe is written.

If you would like a safe method for canning/preserving dilly beans, the Ball Blue Book of Canning is my favorite trusted canning resource. Marissa over at Food in Jars has a great online recipe as well.

Process steps for making homemade dilly beans

How Long Do You Have to Wait To Eat Dilly Beans?

Allow the jars to sit in the fridge for two days before consuming. But um, if you’re anything like me you may need to do a few test bites before those two days are up!

Pro Tips/Recipe Notes:

  • Use the freshest beans you can find; farmer’s markets are a great source for just-picked beans. The fresher the beans, the crispier the finished product.
  • On average, one pound of beans = one quart of dilly beans.
  • Use regular mouth jars if possible. The shoulders/neck of the jars keep the beans in place. And lean those jars on the side when stuffing the beans in. It helps you pack them in better. 
  • The dilly beans will keep in the fridge for 3-6 months.
  • You do not need to sterilize the jars as if you were going to can them. But do make sure they’re clean!
a jar of refrigerator pickled green beans and a head of garlic on a wooden board

Refrigerator Dilly beans WEIGHT WATCHERS POINTS

One serving of Refrigerator Dilly Beans has 1 WW Freestyle SmartPoints.

5 from 26 ratings

Refrigerator Dilly Beans {Pickled Beans Recipe}

Prep: 15 minutes
Cook: 5 minutes
Resting time: 12 hours
Total: 12 hours 20 minutes
Two jars of dilly beans with garlic and red peppers on a wooden board
Learn the secrets of how to make incredible refrigerator pickled green beans.

Ingredients 

  • 2 pounds green beans {washed and trimmed}
  • ice water {for blanching}
  • 1 cup white vinegar
  • 1 cup apple cider vinegar
  • 1 cup water {plus more for boiling the beans}
  • 2 tbsp sugar
  • 2 cloves garlic {halved}
  • 1.5 tsp kosher salt
  • 1/2 cup onion {minced}
  • 4 sprigs fresh dill
  • 1/2 tsp black peppercorns
  • 1/2 tsp red pepper flakes {dried}
  • 2 small chilies {optional}

Instructions 

  • Make your brine: in a saucepan, bring water, vinegar, salt, sugar, and garlic to a boil.
    1 cup white vinegar, 1 cup apple cider vinegar, 1 cup water, 2 tbsp sugar, 1.5 tsp kosher salt, 2 cloves garlic
  • Once it has boiled and the sugar has dissolved, remove from heat, set aside and allow it to come to room temperature.
  • Blanch the beans: boil green beans for 1 minute, and then drain and immediately put in a bowl of ice water for 5 minutes. Drain the beans and set aside.
    2 pounds green beans
  • Equally divide onions, peppercorns, and red pepper flakes in the bottom of clean jars.
    1/2 cup onion, 1/2 tsp black peppercorns, 1/2 tsp red pepper flakes
  • Add beans to the jars. Tuck some of the dill amongst the beans.
    4 sprigs fresh dill
  • Pour the brine over the beans, put a lid on them and keep them on the counter for 12 hours.
  • AFter 12 hours, transfer to the fridge. Allow them to sit in the fridge for 2 days before consuming.

Notes

Use the freshest beans you can find; farmer’s markets are a great source for just-picked beans. The fresher the beans, the crispier the finished product.
 
On average, one pound of beans = one quart of dilly beans.
 
Use regular mouth jars if possible. The shoulders/neck of the jars keep the beans in place.

Nutrition

Calories: 52kcalCarbohydrates: 10gProtein: 1gFat: 0gSaturated Fat: 0gCholesterol: 0mgSodium: 150mgPotassium: 220mgFiber: 2gSugar: 5gVitamin A: 660IUVitamin C: 12.1mgCalcium: 40mgIron: 1mg

Nutrition information is automatically calculated, so should only be used as an approximation.

Additional Info

Course: Appetizer, Snack
Cuisine: American
Tried this recipe?Mention @sustainablecooks or tag #sustainablecooks!

Shop This Post

About Sarah

Helping you serve up budget-friendly sustainable recipes with a side of balanced living.
Come for the food. Stay for the snark.

You May Also Like:

Leave a comment

Your email address will not be published. Required fields are marked *

Recipe Rating


This site uses Akismet to reduce spam. Learn how your comment data is processed.

46 Comments

  1. I’m making your dilly beans today!  Lately I’ve been making a slightly sweet marinade of cukes, onions, and red peppers. My friends can’t get enough!!5 stars

    1. Tell me more about this marinade! Is it closer to a relish or more like something you marinade meat/veggies in? It sounds super tasty!

      1. I’m back. The marinade that we were talking about can be anything it can be a salad. You could use it on sandwiches or just right out of the jar. I found it on Pinterest years ago very simple. Get yourself a huge bowl and slice about five cucumbers, one large onion, and a red pepper. Put them in the big bowl. Mix them up and toss a tablespoon of salt into the bowl and mix until you think the salt is evenly distributed. Meanwhile, in a pan on the stove and one cup of white vinegar, 2 cups of sugar, 1 tablespoon of celery seed and 1 tablespoon of mustard seed when it comes to a boil take it off the heat and let it go to room temperature, and the vegetables to clean mason jars, or whatever is available, pour the brine over the vegetables and put them in the fridge. They’ll be good for about two months.5 stars

    2. I am furious with myself. I just spent 20 minutes typing out the entire recipe for you and then I hit the button thinking it would print and it deleted. I will repeat this for you but this evening I’m going out so tomorrow morning I will send you this wonderful recipe that I took from Pinterest. It can be as a little salad, you can put it on a sandwich. It’s just a real marvel. OK talk to you tomorrow. 5 stars

    1. You can leave it out if you’d like. It helps to balance the flavor of the brine but isn’t 100% necessary to the success of the recipe.

  2. Instruction #4 … do I put 1/2 c onion, 1/2 tsp peppercorn and 1/2 tsp red pepper flakes in the bottom of each jar, or devide it up amongst the jars?

  3. Can you substitute dill seed? I have all ingredients except for the fresh dill, and “town” is an hour away………..

    1. It can work. Will be a little less on the dill flavor but it is still better than no dill at all…or a long trip!

      Dried dill weed would work better if you have any.

    1. You’ll be missing out on a lot of flavor without the salt. Here’s what I would do: dissolve the salt in a tiny amount of water and then add it to the brine.

  4. Are these sweet at all? I’m not a fan of sweet pickles and this is my first time making anything like this.

  5. What are your thoughts on re-using the brine? I read some people who say it is ok but I was curious what you thought.

    1. I think it depends on what you’re using it for, but as long as it’s kept in the fridge, it’s fine. I make fridge pickles and add cucumbers from the garden to the brine when there is room. And then after a few batches, my MIL uses the brine for pickled eggs. 🙂

      1. I’m confused. If I let the brine come to room temperature how will its heat soften the beans? Also, I don’t want soft beans. I want them crunchy.
        I do understand the need for heat for dissolving the salt though. 
        Thanks. 

      2. Sorry, “soften” was probably the wrong word. The beans will be al dente when they are ready to eat. There will be crispness, but not as hard (to chew) as a pure raw green bean.

  6. Do the beans need to be completely covered by brine, I used 4 pounds of beans and doubled the recipe for brine but didn’t have enough to cover beans

    1. Yes, you do want them covered to keep them fresh. How much “bean” is exposed? When that happens to me (some beans are just thirstier than others!), and it’s just a little bit to go, I will combine just water and vinegar.

      1. They will stay hard as fresh beans if you don’t. If you want them super crunchy, then you don’t have to blanch them. They will likely take more time to absorb the flavor though.