As an Amazon Associate, I earn from qualifying purchases.
This step-by-step tutorial will teach you about Canning Pumpkin safely in a pressure cooker. Preserving pumpkins give you so many recipe options – pumpkin puree, pie filling, or even pumpkin butter.

A few hours spent pumpkin canning will keep you out of the stores looking for those (always!) dented cans of pumpkin.
Home-canned pumpkin cubes give you so many options for baking and cooking amazing dishes.
Can Pumpkin Be Safely Canned?
Yes, pumpkin can be safely canned. But with a few caveats:
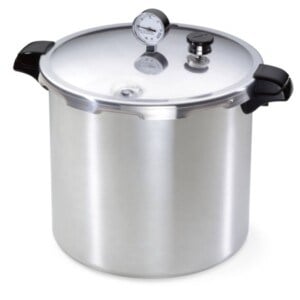
- You must use a pressure canner.
- You must can the pumpkin in cubes.
- You cannot safely can pumpkin puree.
If you don’t have a pressure canner, check out my tutorial on freezing pumpkin.

Get my Canning e-book!
It’s 51 pages of every helpful tip and trick you could want as a brand new canner, AND it includes 13 ad-free canning recipes that are designed to take you from novice to pro.
How to Can Pumpkin – Step-by-Step
*I’ll walk you through it here with some photos and tips, and you’ll also find a printable recipe card at the bottom of the post with exact measurements, etc. You can also click “jump to recipe” to skip down.
Canning Prep
Wash and clean your jars. It is no longer necessary to sterilize jars before canning (hurray!) but you should make sure they are preheated enough to not crack when placed in hot water.
You can put them in a clean dishwasher and run them through a quick wash cycle, or place them in a large pan with some water in a low-heat oven (my lowest temp is 170˚F degrees) until you need them. I’ve even just put hot tap water in them before and left them on the counter.
Wash your lids with hot soapy water. Rinse and place them in a clean bowl for now
Prepare the Pumpkins For Canning
Wash and dry the pumpkin and then cut it in half, slightly on one side of the stem. Remove the stem from the section that has it.
Remove the innards using a spoon. It’s ok to not get all the strings out of it; we’ll deal with it later.

Lay one half of the pumpkin, cavity side down, and slice it like you’re slicing a melon. Repeat with the other half. Cutting it this way with the gooey side facing down prevents the pumpkin from sliding around, and keeps your fingers intact.
Place the slices onto a plate and microwave for 1 minute. This will soften the pumpkin to make the next step easier.
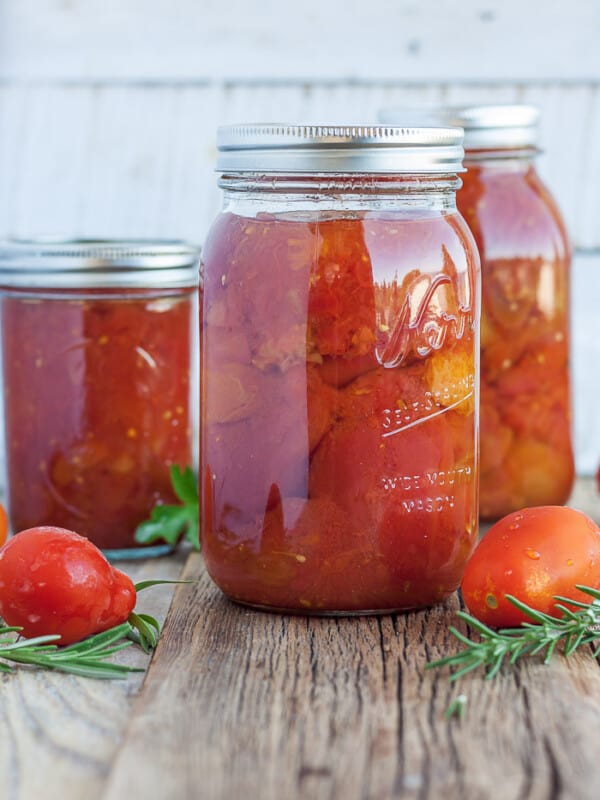
Using a paring knife, take one of the slices, cut the rind off of it, and then the inner side as well. Cut into 1-inch chunks. Repeat with the rest of the pumpkin.

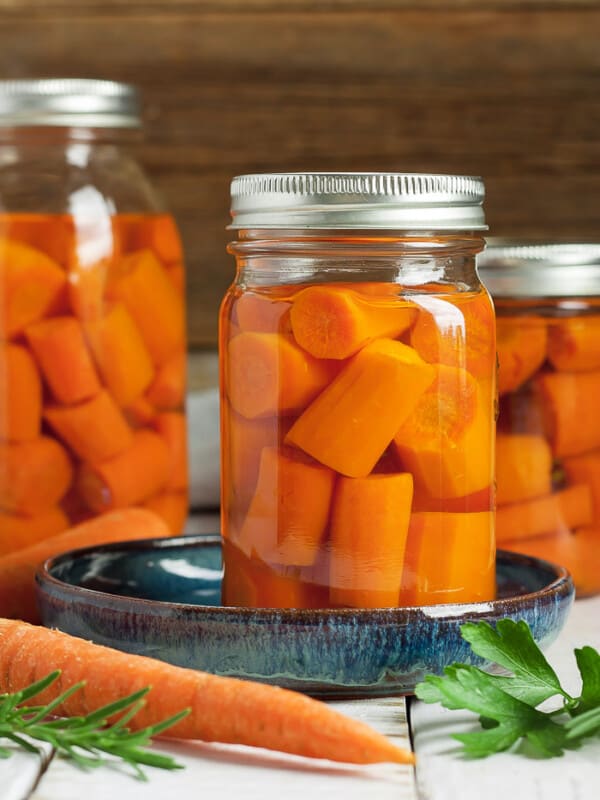
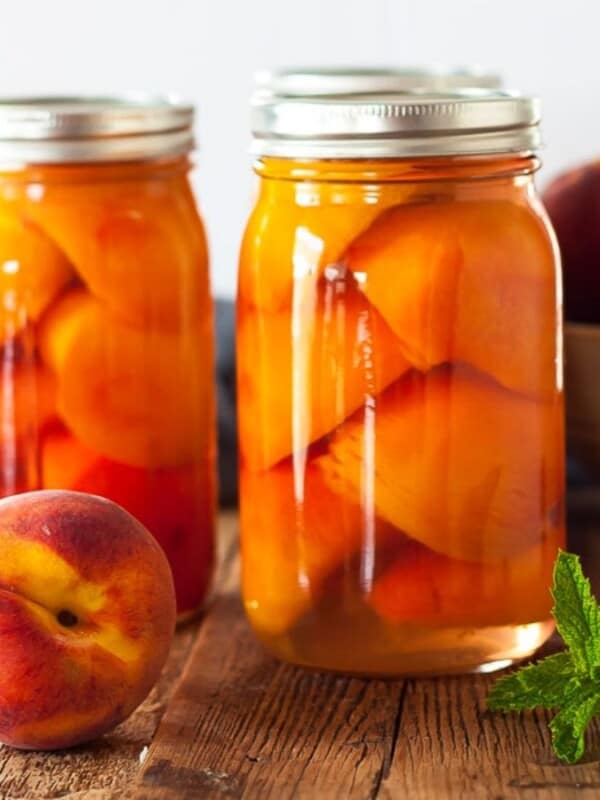
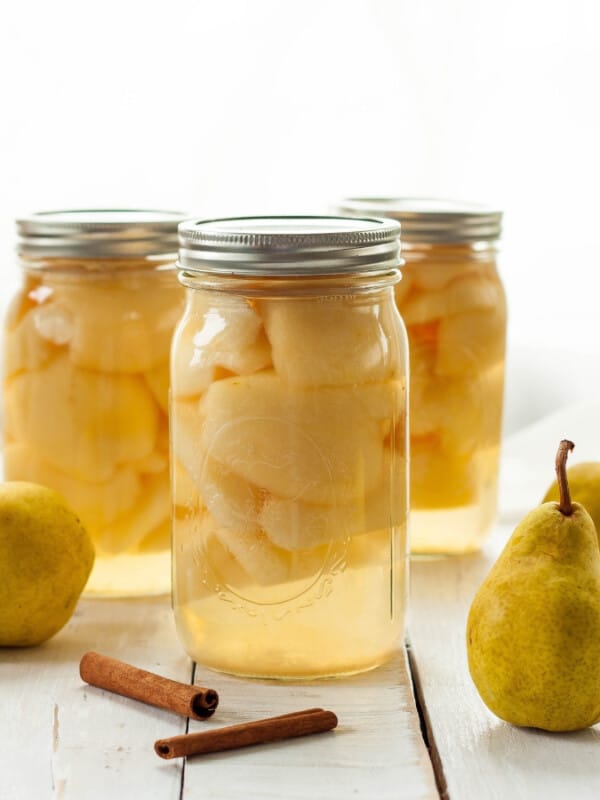
Bring two pots of water to a boil. In one of the pots, add the pumpkin cubes in batches and cook for 2 minutes. Using a slotted spoon, remove the pumpkin cubes and put them into warm and sanitized canning jars. Using a canning funnel will make this part easier.
Use clean boiling water from the second pot and carefully ladle it over the pumpkin chunks, leaving 1 inch of headspace. Headspace is defined as the space between the top of the food and the top of the jar. Remove the bubbles from the jar (I use a plastic chopstick).
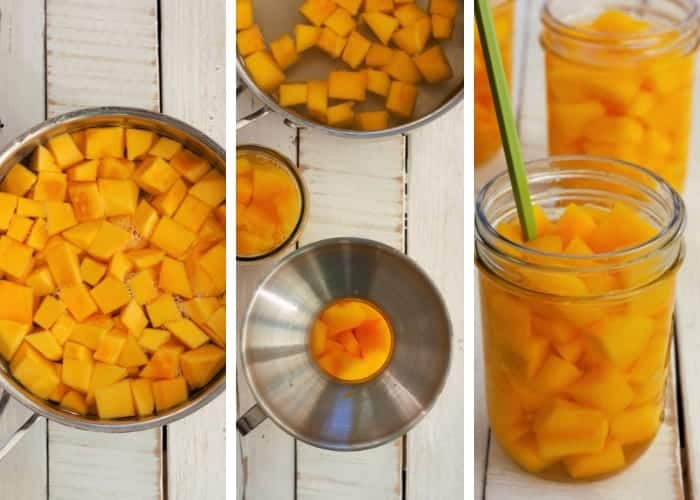
Use a wet clean rag and wipe the rim of the jars to make sure it is free of any food.
Place a clean lid on the jar and tighten the ring to fingertip tight (tight enough that it won’t come off, but not so tight that the Hulk couldn’t budge it).

How to Pressure Can Pumpkin
Lower your jars into the canner using a jar lifter. Lock the lid. Soon, steam will start coming through the vent pipe (I call it the steam chimney). Allow the steam to pass through for about 10 minutes.
Then put the pressure regulator (I call it the chimney cap) on top. Pretty soon, the air vent will pop up. That is a sign that you’re starting to build pressure inside the canner.

Processing times will vary based on altitude. See the chart below.
Pressure Canning Pumpkin in a Dial-Gauge Pressure Canner
| Canner Pressure (PSI) at Altitudes of | ||||||
| Style of Pack | Jar Size | Processing Time | 0-2,000 ft | 2,001-4,000 ft | 4,001-6,000 ft | 6,001-8,000 ft |
| Hot | Pints | 55 min | 11 lbs | 12 lbs | 13 lbs | 14 lbs |
| Quarts | 90 min | 11 lbs | 12 lbs | 13 lbs | 14 lbs | |
| *Source: National Center For Home Food Preservation | ||||||
Processing Time for Pumpkin in a Weighted-Gauge Pressure Canner
| Canner Pressure (PSI) at Altitudes of: | ||||
| Style of Pack | Jar Size | Processing Time | 0-1,000 ft | Above 1,000 ft |
| Hot | Pints | 55 min | 10 lb | 15 lb |
| Quarts | 00 min | 10 lb | 15 lb | |
| *Source: National Center For Home Food Preservation | ||||
When the dial gauge reaches the appropriate PSI, reduce the burner temp to medium, and start your timer. The pressure must stay at the PSA or (a little bit) above for the duration of the cooking time. You’ll likely need to adjust the temp on the burner a few times depending on your stove.
When the time is up, remove the canner from the burner and allow it to sit until you hear a distinctive “click” of the air vent dropping. Remove the pressure regulator and carefully remove the lid of the canner (Pro tip: I always use oven mitts when I take the lid off because the steam is super hot).
Let the jars sit for 5 minutes in the canner and then carefully lift them out with canning tongs. Pro tip: allowing the jars to sit in the canner with the lid off can help reduce the siphoning of liquid in your jars. Siphoning is when liquid seeps out from under the lids and reduces the overall amount of liquid in the jar.
Place hot jars on a towel where they can sit undisturbed for 12 hours.
After a few hours, to check for sealing, gently press down in the middle of the lid. If the lid has no give, it’s sealed. If you can press the lid in and it pops a bit, your jars are not sealed.

WHAT IF MY JARS DON’T SEAL?
If you’ve correctly processed the pumpkins, and the lids still didn’t seal, you can reprocess them.
Double-check to make sure there are no:
- Chips in the rim of the jar
- Dried bits of pumpkin on the rim (anything between the rim and the lid may prevent a seal.
Best practices would involve using brand-new lids for reprocessing. Set aside the old lids to use for dry storage.
If the jars don’t seal on the second attempt, you likely have a bad batch of lids, or your canning process has a step missing. Email me and we’ll try to troubleshoot what is going on.
HELP! WHY ARE MY JARS LEAKING WATER?
If you find that water has leaked out after they have sealed, you have experienced a common canning issue called siphoning. It happens to the best of us!
Siphoning is typically caused by not allowing the jars to rest in the canner after they have finished processing. In the directions, you’ll see that I recommend you remove the canner from the burner, remove the lid, and let it sit for 5 minutes.
This is important as it allows the jars time to rest before being allowed to cool on the counter. Doing this process will significantly cut down on siphoning.
IF YOU HAVE SIPHONING IN YOUR JARS, FOLLOW THESE STEPS:
- Check – are the lids still sealed?
- Look – have you lost less than half of the amount of liquid in the jar?
- Examine – do the pumpkin cubes look fresh with bright colors?
If the answer to the above three steps is “yes!”, then they are safe to eat. If you lost quite a bit of liquid, the uncovered pumpkin will turn color more quickly. Plan to eat those jars first.
What Kinds of Pumpkin Are Best For Canning?
You can use almost any pumpkin or winter squash, but you’ll have the best results by using pie pumpkins.
A few pie pumpkin varietals are: Sugar Snack, Sugarbush, Pam Pie, and Sweet Sugar Pie.
STORAGE FOR HOME CANNED Pumpkin
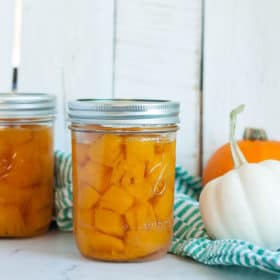
Once the jars have sealed, remove the rings. Label and store sealed jars in a cool (best results are 50-70˚F) dark place for up to 12-18 months.
If you have the space available, do not stack the jars on top of each other more than two jars high
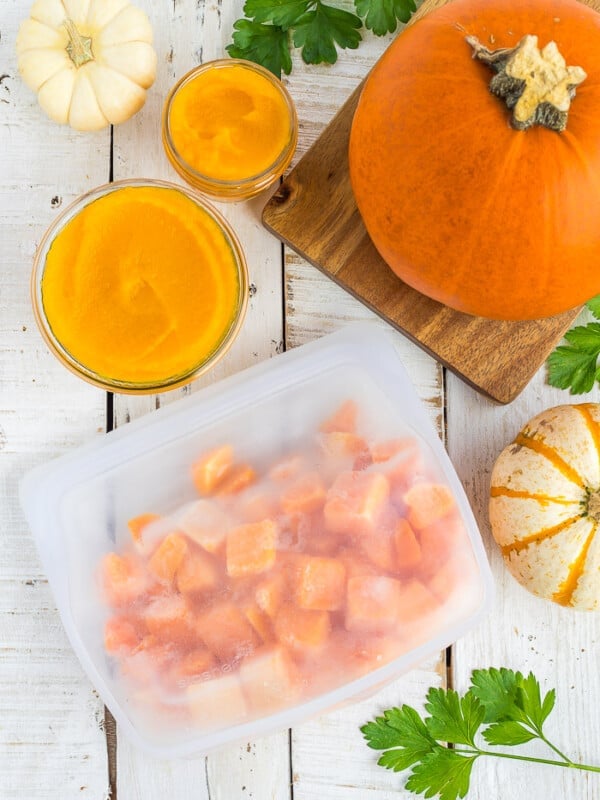
Can You Can Pumpkin Puree?
Unfortunately, no. The density of pumpkin puree is too thick for the home canner to safely heat to the core and kill botulism spores. Yikes, just don’t go messing around with that.
Pumpkin puree cannot be canned in a water bath OR a pressure canner.
How To Use Home-Canned Pumpkin
I use it in muffins, pumpkin bread, or pumpkin spice cookies. In a pinch, you could use it in place of butternut squash in spicy butternut squash soup.
If you would like to puree it for pumpkin butter, pie, or other baked goods, drain most of the liquid from the jar and puree. For ease, I just stick my immersion blender directly into the canning jar.
My preference is to do my pumpkin canning in pint-sized jars. The processing time is less compared with quarts, and once drained, a pint jar is about equivalent to a 15 oz can you’d buy in the store.
Canning Pumpkin Pro Tips/Recipe Notes
- I have mentioned this a few times, but you must have a pressure canner to safely can these cubes of pumpkin.
- You may add spices or salt if you’d like, but doing so limits your choices on how to use it after it has been canned.
- Pressure canners can often leave white lines on lids and rings. It’s totally normal and safe. To prevent this, add 1/3 cup of white vinegar to the canner with the 3 quarts of water before processing.
How to Can Pumpkin
Equipment
Instructions
Canning Prep
- Wash and clean your jars. Fill with hot water or keep them warm in a clean dishwasher or oven.
- Wash your lids with hot soapy water. Rinse and place them in a clean bowl.
Pumpkin Prep
- Wash and dry the pumpkin and then cut it in half, slightly on one side of the stem. Remove the stem from the section that has it.1 small pie pumpkin
- Remove the innards using a spoon. It's ok to not get all the strings out of it; we'll deal with it later.
- Lay one half of the pumpkin, cavity side down, and slice it like you're slicing a melon. Repeat with the other half.
- Place the slices onto a plate and microwave for 1 minute. This will soften the pumpkin to make the next step easier.
- Using a paring knife, take one of the slices, and cut the rind off of it, and then the inner side as well. Cut into 1-inch chunks. Repeat with the rest of the pumpkin.
- Bring two pots of water to a boil. In one of the pots, add the pumpkin in batches and cook for 2 minutes.10 cups water
- Using a slotted spoon, remove the pumpkin and put them into warm and sanitized canning jars.
- Add 3 quarts of water to your pressure canner and put it on a burner set to high. Make sure there is a canning rack in the bottom of the canner.
- Use boiling water from the second pot and carefully ladle it over the pumpkin chunks, leaving 1 inch of headspace.
- Remove the bubbles from the jar (I use a plastic chopstick).
- Use a wet clean rag and wipe the rim of the jars to make sure it is free of any food.
- Place a clean lid on the jar and tighten the ring to fingertip tight.
Pressure Canning Pumpkin
- Using canning tongs, gently place the jars in the canner. Lock the lid. Soon, steam will start coming through the vent pipe.
- Allow the steam to pass through for about 10 minutes. Then put the pressure regulator on top.
- Pretty soon, the air vent will pop up.
- In a dial-gauge pressure canner, process pints and quarts based on the elevation guide below (see processing chart in post for additional altitude adjustments):*0-2,000f ft {PSI: 11 lbs of pressure} = Pints 55 min, Quarts 90 min*2,001-4,000k ft {PSI: 12 lbs of pressure} = Pints 55 min, Quarts 90 min*4,001-6,000k ft {PSI 13 lbs of pressure} = Pints 55 min, Quarts 90 min*6,001-8,000k {PSI 14 lbs of pressure} = Pints 55 min, Quarts 90 min
- When the dial gauge reaches the appropriate PSI, reduce the burner temp to medium, and start your timer. The pressure must stay at the PSI or (a little bit) above for the duration of the cooking time.
- When the time is up, remove the canner from the burner and allow it to sit until you hear a distinctive “click” of the air vent dropping. Remove the pressure regulator and carefully remove the lid of the canner (Pro tip: use oven mitts to take the lid off because the steam is super hot).
- Let the jars sit for 5 minutes in the canner and then lift them out with canning tongs.
- Place on a thick clean towel undisturbed for 12 hours.
- After a few hours, to check for sealing, gently press down in the middle of the lid. If the lid has no give, it’s sealed. If you can press the lid in and it pops a bit, your jars are not sealed.
Notes
- Store in a cool dark place for 12-18 months.
- Save the seeds for making roasted pumpkin seeds.
Nutrition
Nutrition information is automatically calculated, so should only be used as an approximation.


I know you can’t can pumpkin puree, but I know you can do chili. Is it possible to can pumpkin chili? I have a pumpkin chicken chili recipe I was hoping to can…
Hi Janne, I have never done it and thus haven’t done any of research into it. I did find this recipe with processing times/instructions on the National Center for Home Food Preservation that may be helpful to you.
I put mine in the oven after they are out of the canner- let them cool over night- they always seal put the jars close together. Tonight I am canning 14 quarts. It frees up counter space, they stay out of the drafts which means you dont have to cover them with towels- so they dont crack and it works like a charm every time.
Happy canning, Diana! Thanks for the tip; I’ve never heard that one before.
Can you can or use other larger pumpkins as well? I know I could can them but have you ever used carving pumpkins in a food recipe? We have surplus 20+ Connecticut pumpkins and trying to see if someone has experience using the larger pumpkins?
Hi Kristen, I have only canned the pumpkins that I have accidentally (my chickens planted them with their compost) grown in my garden. You can use larger pumpkins if you’d like, but it all comes down to how you want to use them once they’re canned. In my experience, larger pumpkins for the most part are inferior when it comes to taste for making most pumpkin-centered desserts.