As an Amazon Associate, I earn from qualifying purchases.
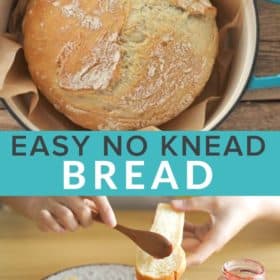

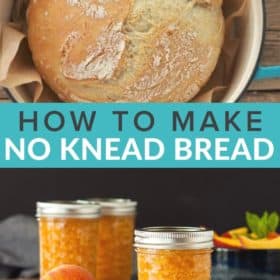
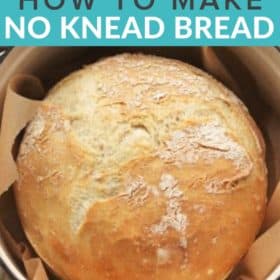
No-Knead Dutch Oven Bread is the perfect easy bread for new bakers. This simple vegan homemade bread recipe has a short ingredients list and doesn’t require a stand mixer.

No-Knead Dutch Oven Bread is the perfect comfort food when you want homemade bread but have never actually made homemade bread before.
It truly is that simple. Congrats…you’re about to be a bread baker!
What’s in this recipe?
- Flour – a mixture of bread flour and whole wheat
- Yeast – either rapid or active dry works!
- Sea or table salt
Equipment Needed
- A dutch oven – a 4 or 6 quart works best. You need something with a lid that can be heated to 450 degrees F.
- Medium mixing bowl
- Whisk (I use this one) or silicone spatula
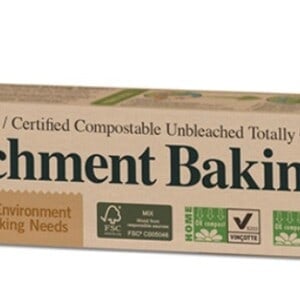
- Parchment paper (do NOT use waxed paper)
- A cover for the mixing bowl – I use these silicone lids or Beeswrap
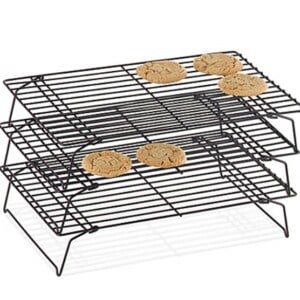
- Baking cooling rack
Here’s How to Make It:
This recipe is broken down into three steps: the initial rise, second rise/rest, and baking. You’ll find a detailed and printable version of this at the bottom of the post.
Step one: the initial rise
Mix all the ingredients in a medium bowl. The dough shouldn’t be wet, but it will be shaggy and sticky. If it is too wet, add flour 1 tbsp at a time until the side of the bowl are mostly clean. Cover and allow to rise for 12-18 hours. The dough will be ready when it has tripled in size and is dotted with lots of air bubbles.

If you’re pressed for time, you can let it rise in an Instant Pot fitted with a glass lid. Drizzle a bit of olive oil in the Instant Pot insert and add the dough. Press “Yogurt”, and adjust the time to 4 hours.

Step two: second rise/rest
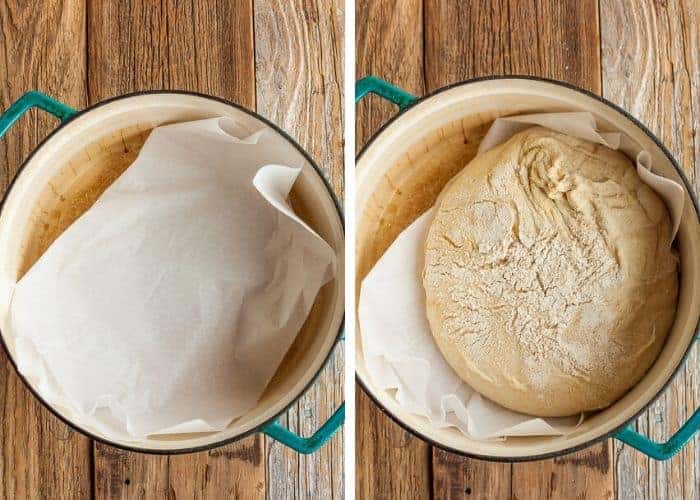
When the dough has tripled in size, sprinkle flour on a clean surface. Flour your hands and sprinkle a bit around the inside edges of the bowl. Grab the dough (it usually won’t come out in just one piece) from the bowl and place on top of the floured surface. Sprinkle a bit more flour on top of the dough and fold it over itself 1-2 times. Allow it to rest for 15 minutes.
Add a thin clean towel in a bowl and sprinkle liberally with flour. Flour the dough again until you can form it into a ball without it sticking to the counter. Place in the bowl and cover with the edges of the towel. Allow it to rest for 1 hour.

Step three: Baking
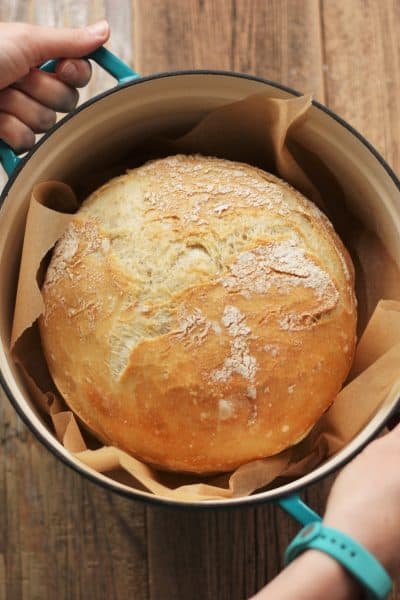
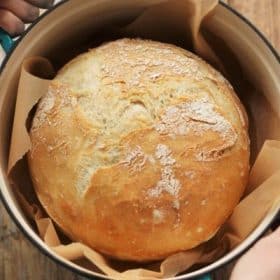
Fit the dutch oven with a piece of parchment paper. Place the lid on it and put it in the oven. Preheat to 450 degrees F. Once preheated, remove the lid of the dutch oven. Reduce the oven temp to 400 degrees F.
Gently tip the dough out of the bowl and into the dutch oven. Place the lid back on it and bake at 400 F for 30 minutes. Remove the lid after 30 minutes, and bake for an additional 15 minutes. Remove from the dutch oven immediately and allow it to fully cool on a baking rack.
Pro Tips/Recipe Notes
- Do not attempt to cut into the bread until it has fully cooled.
- This bread does not freeze well as it tends to get crumbly upon thawing.
- Do not use waxed paper in place of the parchment – it will fuse to the bottom of the bread.
- Use a day-old loaf for making Sage Sausage Stuffing.
Variations
- Want to make a pizza dough version of this? Try our Overnight Pizza Dough.
- You can take this bread next level and serve it with flavored butter like honey, herbs, or garlic butter (related: how to freeze garlic). Simply blend cool chunks of butter and any mix-ins in a food processor.
- Add chunks of garlic and cheese for Roasted Garlic No-Knead Bread.
- Top with butter and homemade jam. Related: Strawberry Freezer Jam, Peach Freezer Jam, Blackberry Freezer Jam, or No-Cook Raspberry Freezer Jam.
More Delicious Bread Recipes
- Check out all these Pantry Staples You Can Make Yourself
- Overnight Cinnamon Rolls
- Stuffing Biscuits
- Eggnog Bread Pudding
- Air Fryer Texas Toast
- Air Fryer Biscuits
- Air Fryer Pretzel Bites
- Honey Wheat Sandwich Bread
- Air Fryer Cornbread
- Red Lobster Cheddar Bay Biscuits
- Homemade Whole Wheat Hamburger Buns
- Cheesy Garlic Bread
- 100% Whole Wheat Pizza Dough
No Knead Dutch Oven Bread
Ingredients
- 1/4 tsp active dry yeast
- 2 cups warm water I usually aim for about 110 degrees
- 3 1/2 cups bread flour
- 1/3 cup whole wheat flour plus more for dusting
- 1 1/2 tsp salt
Instructions
- Mix all the ingredients in a medium bowl. The dough shouldn’t be wet, but it will be shaggy and sticky. If it is too wet, add flour 1 tbsp at a time until the side of the bowl are mostly clean.1/4 tsp active dry yeast, 2 cups warm water, 3 1/2 cups bread flour, 1/3 cup whole wheat flour, 1 1/2 tsp salt
- Cover and allow to rise for 12-18 hours. The dough will be ready when it has tripled in size and is dotted with lots of air bubbles.
- Flour a work surface and your hands. Sprinkle a bit of flour around the inside of the bowl, and remove the dough from the bowl.
- Sprinkle the dough with flour, and fold it over itself once or twice. Let it rest for about 15 minutes.
- Add a thin clean towel in a bowl and sprinkle liberally with flour. Flour the dough again until you can form it into a ball without it sticking to the counter. Place in the bowl and cover with the edges of the towel. Allow it to rest for 1 hour.
- At least 20 minutes before the dough is ready, preheat the oven to 450 degrees F. Place a sheet of parchment inside your dutch oven and put the lid on it. Place the dutch oven in the oven while it is preheating.
- Once preheated, remove the lid of the dutch oven. Reduce the oven temp to 400 degrees F.
- Gently tip the dough out of the bowl and into the dutch oven. Place the lid back on it and bake at 400 F for 30 minutes.
- Remove the lid after 30 minutes, and bake for an additional 15 minutes.
- Remove from the dutch oven immediately and allow it to fully cool on a baking rack.
Notes
Nutrition
Nutrition information is automatically calculated, so should only be used as an approximation.


Umm…it appears that your “fitness tracker” wrist strap is attached incorrectly. The strap is inside out and it’s much too loose.
Pretty much all flour contains fat, by the way.
Just sayin’
My fitness track strap works well and it is comfortable. Nor is the strap inside out. There is no need to mansplain how one should comfortably wear a watch.
Bread flour contains 0 grams of fat. Just sayin’.
REgular yeast or instant yeast?
I use active dry since, with a 12-18 hour rise, there is nothing “instant” about this process. 🙂
Hey girl, hey! Possible silly question: Can I make a baguette with this recipe using a french bread pan? If not, don’t you have a french bread recipe? I could have sworn that you raved about a french bread pan that you found at a second hand store about a hundred years ago. Am I making things up, again? Thanks for your time!
You’re not making things up and I definitely have a french bread pan from Goodwill.
I haven’t tried this recipe in it; I use one from a cookbook that I have. But I do think it would probably work!
K. I found a no knead baguette recipe online. Cross your fingers.
Have you given any thought to the walkie-talkies? They would really help me out! (-;
Lovely recipe. But how does each slice contain 2% saturated fat, when there’s no fat in the ingredients? Curious 2 know. Thank you.
Kani, the nutrition details are automatically generated by our recipe card…but it’s a solid question and I have no idea where that fat is coming from! I’ll have to run the details again. 🙂
Can you use all bread flour if have no whole wheat?
Yes!
This was SO GOOD and so easy. We plowed through it so fast, I’ve already started a second batch. Thank you!!
Look at you – you’re a bread baker!!! 🙂
Hi there! So the ingredients have been in my pantry and I’ve been getting the courage to make this for about a month now, because baking is NOT my strength. But I finally did it, and I’m about an hour away from putting in the oven and I’m overwhelmed at how sticky and wet it is. I’ve added flour as I’ve gone along and it does not seem to help. Do you think I did something wrong? The only thing I did differently was use all purpose flour. Thanks!
This sadly is not a recipe where you can replace the bread flour with all-purpose and expect the same results. Bread flour has more protein and thus more gluten. You need all that extra gluten to produce the “rise” of this bread.
I would say go ahead and bake it, but don’t expect too much.
If you had used bread flour and it was still sticky, I would have a few other suggestions about what was wrong (too long of rise time). But this is one where ingredient substitution isn’t intended.
Does the Instant Pot method of rising give the same results as the12-18 hours? I never think the night before about making bread!
In terms of taste, it’s exactly the same. But I find it doesn’t get as rounded when baked as the long rise time.
I miss bread! My elimination diet revealed that I have a gluten sensitivity aka major gas, bloating & gastric unhappiness 🙁 Wonder if I could find a way to make this gluten free.
So I think what makes this bread rise over time is the gluten in the bread flour. I’m so sorry.
Have you tried sourdough or soaked grain bread? Often times people who have gluten issues do better with sourdough and soaked grains.
Oh well, I’ve only baked real bread once so I’m not very seasoned in this department.
This is my go to when I want to impress people. It never fails!
Nothing better than fresh bread, right? 🙂
Since the death of our bread machine, I am thinking I will give this a go!
So, kind of a random question…what size is your dutch oven? I’m looking to make a bread bowl just the right size to hollow it out and put a dip in it! Yep, I just said that. I have (what I feel like) is a large dutch oven and my bread “bowls” always come out looking like a bread blob. I need help. yep, I NEED HELP HERE PEOPLE. Also, could you recommend a brand to purchase one from? I’d prefer one not made in China but ya know…
I would recommend Lodge. They’re made in the US, but I do think the enameling process is done overseas. I have a Martha Stewart one and it chips. It was a gift.
I have a six quart dutch oven and can often get bread blobs from it. I also have a 3 or 4-quart one that someone gave me and that makes much rounder, more bowl-like bread. I think 3-4 would be your best bet!
do you not add any vital wheat gluten?
It is such a small amount of whole wheat flour, so I don’t even worry about it.
I think I’ve read every single one of your posts and still find my self cracking up re-reading them. Have not yet made this bread, but I plan on making it this weekend to go with some Kale and White Bean soup- the garden is basically vomiting fresh kale at me so I have to use it somehow. The best kind of kale is the free kind 🙂
from Pam in Texas….LOVE LOVE L O V E this site!!
Ok.. I just found your site. It was mentioned on Living on Dime somewhere and followed a link or googled it… either way. I love your thinking. hahahaha.
I FINALLY found a big Dutch Oven at The Salvation Army….a bargain at $9.99…and made this recipe tonight.
I just put a bit of butter on my slice. Yum! Yum! Yum!
THANK you for putting this recipe here!
I can’t stop laughing. I’m so glad I found this site. I’ll be sharing it with my sisters and laughing along with them.
thats just funny.
I am no longer stressed but I will try this eventually!!!